Tutorial on TensorOpera AI Platform
Video Tutorial:
Write Once, Run Anywhere: Seamlessly Migrate Your Local Development to the Real-world Edge-cloud Deployment
- How Does TensorOpera AI Platform Work?
- Local Development and Building MLOps Packages
- Create Application and Upload Local Packages
- Install FedML Agent: fedml login $account_id
- Invite Collaborators, Create a Group and a Project
- Start Run (Training) via Automated Deployment and Scaling
- Experimental Tracking via Simplified Project Management
- FedML OTA (Over-the-Air) upgrade mechanism
How Does TensorOpera AI Platform Work?
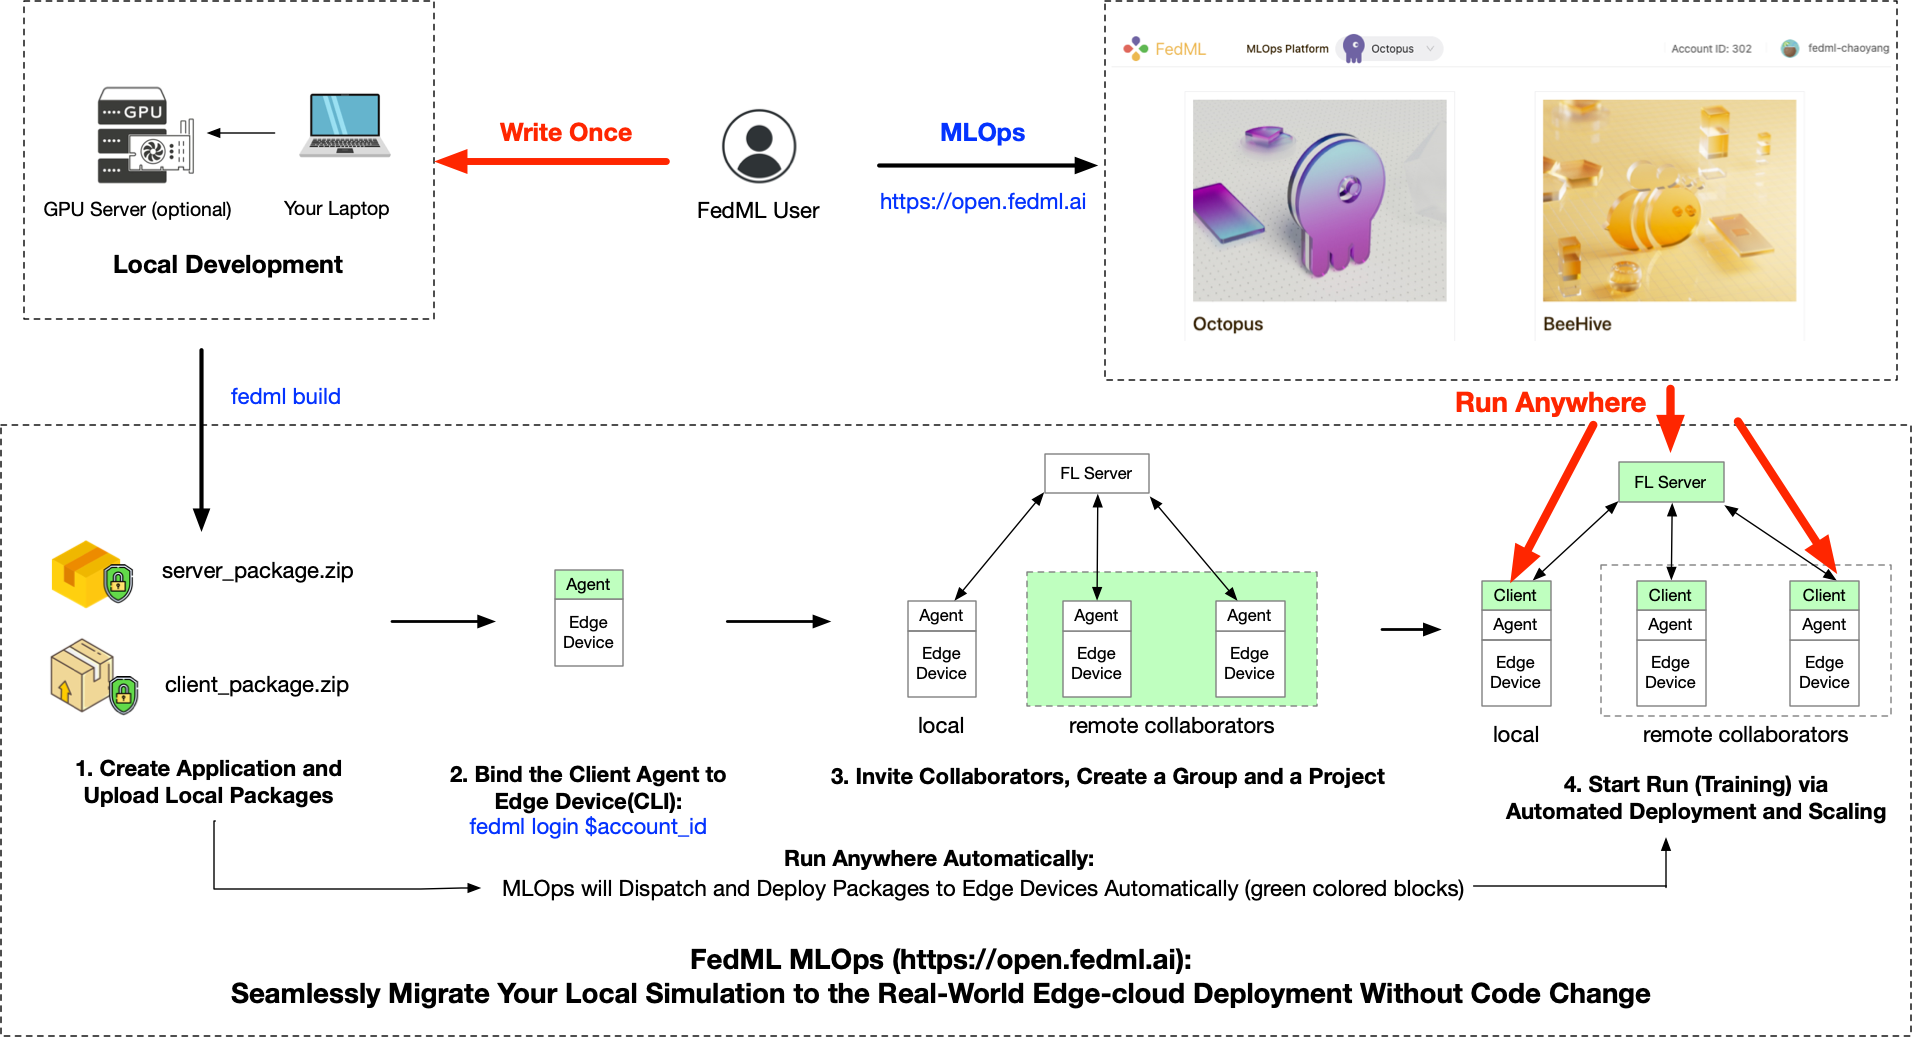 Figure 1: the workflow describing how MLOps works
MLOps works following the figure above; this workflow is handled by a web UI and thus avoids complex deployment. To begin, please create an account:
- Instructions for registration: Please open https://tensoropera.ai and click "Sign Up".
Local Development and Building MLOps Packages
After you finish the local developing/debugging of the FedML project using FedML library (e.g., successfully run the example https://docs.tensoropera.ai/federate/cross-silo/example/mqtt_s3_fedavg_mnist_lr_example), you can now deploy it into the real-world edge-cloud system.
Next, we use the cross-silo project example at https://github.com/FedML-AI/FedML/tree/master/python/examples/federate/cross_silo/mqtt_s3_fedavg_mnist_lr_example/one_line to guide you through how to deploy it and collaborate with others' data silos.
1. Create Application and Upload Local Packages
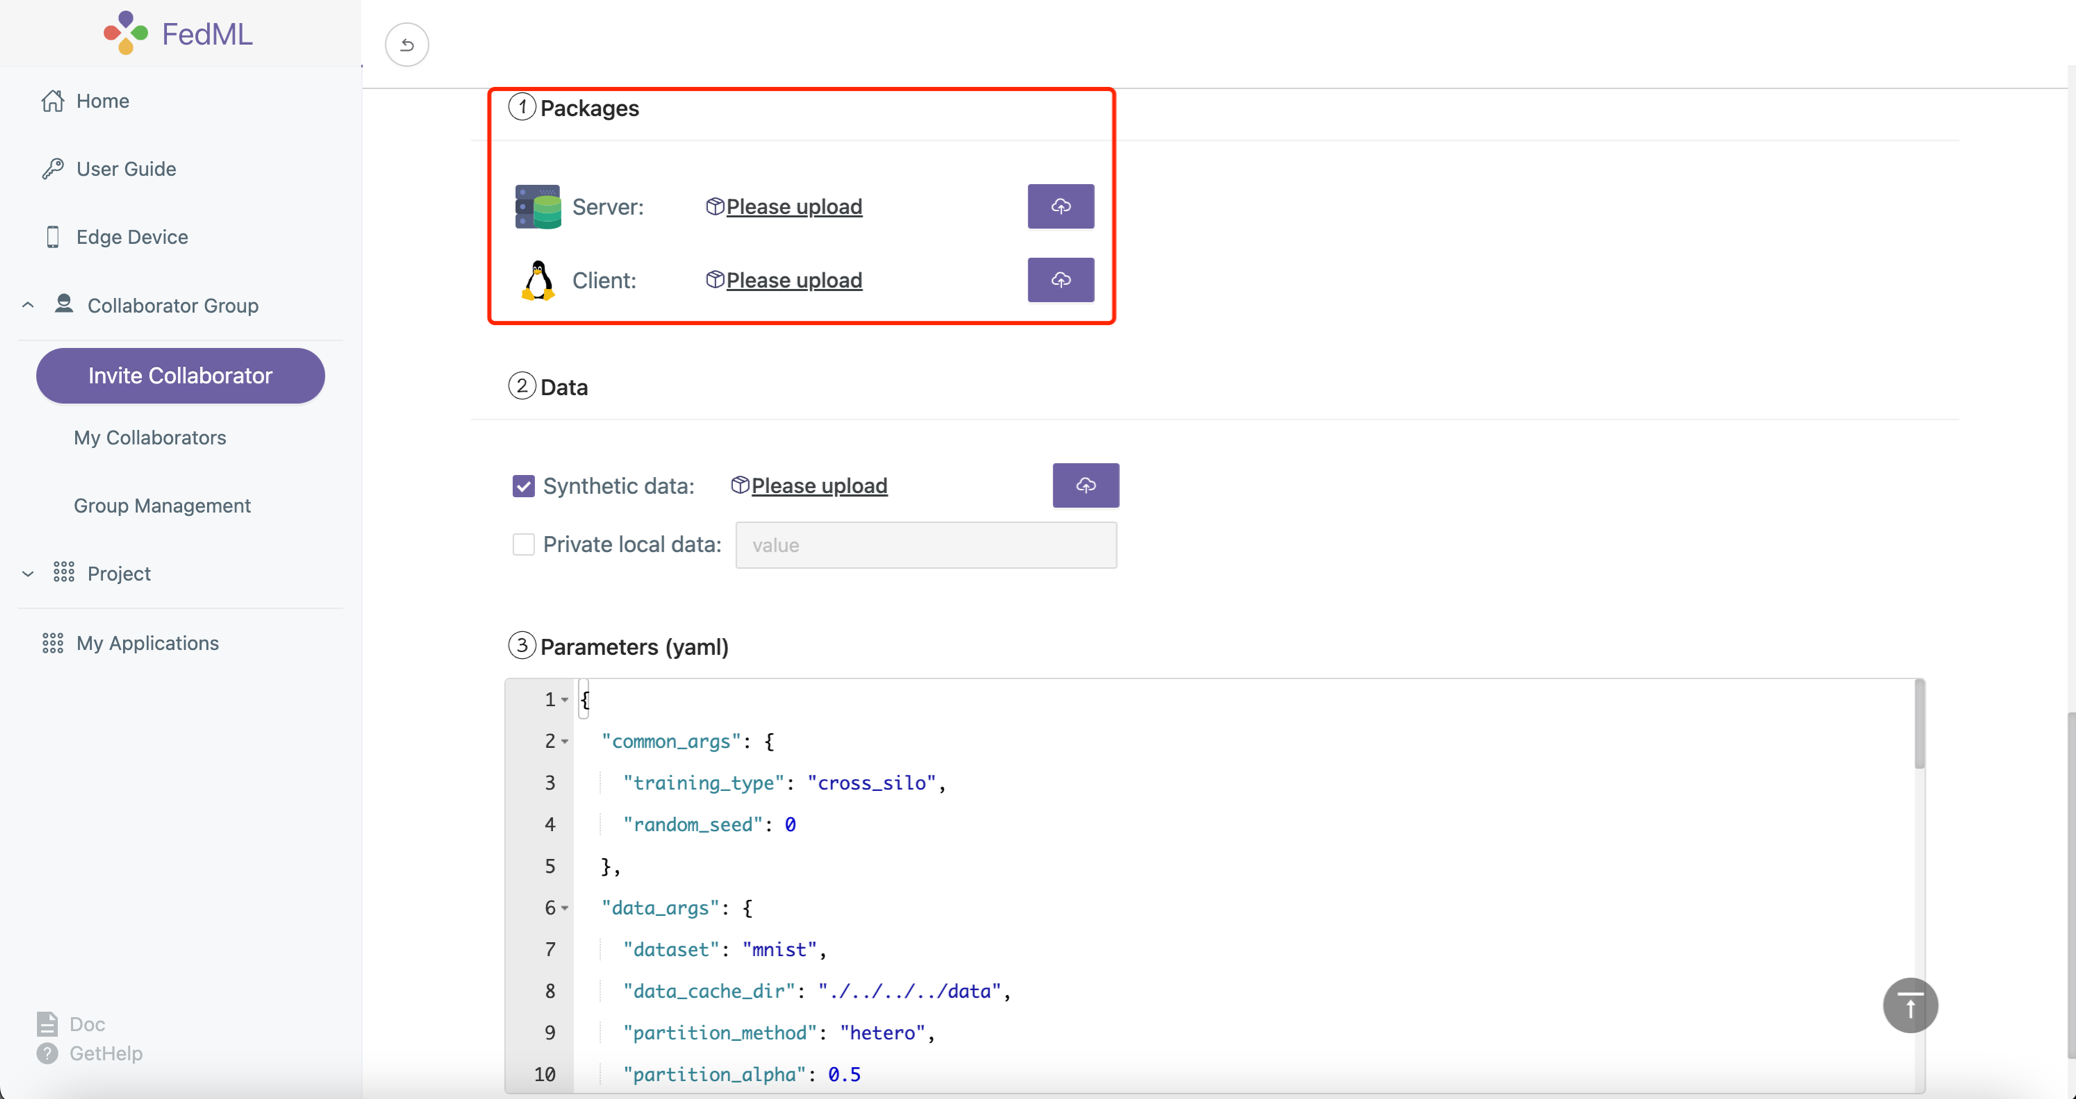
You can use the following FedML CLI to build the package, and then upload the packages as shown in the figure above.
fedml build -t client -sf $SOURCE -ep $ENTRY -cf $CONFIG -df $DEST

Usage: fedml build [OPTIONS]

  Commands for fedml.ai MLOps platform

Options:
  -t, --type TEXT            client or server? (value: client; server)
  -sf, --source_folder TEXT  the source code folder path
  -ep, --entry_point TEXT    the entry point of the source code
  -cf, --config_folder TEXT  the config folder path
  -df, --dest_folder TEXT    the destination package folder path
  --help                     Show this message and exit.
The following script uses examples/cross_silo/mqtt_s3_fedavg_mnist_lr_example/one_line as an example to illustrate the arguments for building MLOps packages. Please replace related values with your own.
- Build the deployable package for the client
git clone https://github.com/FedML-AI/FedML
cd ./FedML/python/examples/cross_silo/mqtt_s3_fedavg_mnist_lr_example/one_line

SOURCE=client
ENTRY=torch_client.py
CONFIG=config
DEST=./mlops
fedml build -t client -sf $SOURCE -ep $ENTRY -cf $CONFIG -df $DEST
Note: for ENTRY, please only specify the file name (torch_client.py) under the SOURCE folder; please do not pass the absolute path.
If the script works correctly, the console log should be as follows.
(mnn37) chaoyanghe@Chaoyangs-MBP python % fedml build -t client -sf $SOURCE -ep $ENTRY -cf $CONFIG -df $DEST
Argument for type: client
Argument for source folder: examples/cross_silo/mqtt_s3_fedavg_mnist_lr_example/one_line/client
Argument for entry point: torch_client.py
Argument for config folder: examples/cross_silo/mqtt_s3_fedavg_mnist_lr_example/one_line/config
Argument for destination package folder: ./mlops
Now, you are building the fedml packages which will be used in the MLOps platform.
The packages will be used for client training and server aggregation.
When the building process is completed, you will find the packages in the directory as follows: ./mlops/dist-packages.
Then you may upload the packages on the configuration page in the MLOps platform to start the federated learning flow.
Building...
You have finished all building process.
Now you may use ./mlops/client-package.zip to start your federated learning run.
- Build the deployable package for the server
SOURCE=server
ENTRY=torch_server.py
CONFIG=config
DEST=./mlops
fedml build -t server -sf $SOURCE -ep $ENTRY -cf $CONFIG -df $DEST
Note: for ENTRY, please only specify the file name (torch_server.py) under the SOURCE folder; please do not pass the absolute path.
If the script works correctly, the console log should be as follows.
(mnn37) chaoyanghe@Chaoyangs-MBP python % fedml build -t server -sf $SOURCE -ep $ENTRY -cf $CONFIG -df $DEST
Argument for type: server
Argument for source folder: examples/cross_silo/mqtt_s3_fedavg_mnist_lr_example/one_line/server
Argument for entry point: torch_server.py
Argument for config folder: examples/cross_silo/mqtt_s3_fedavg_mnist_lr_example/one_line/config
Argument for destination package folder: ./mlops
Now, you are building the fedml packages which will be used in the MLOps platform.
The packages will be used for client training and server aggregation.
When the building process is completed, you will find the packages in the directory as follows: ./mlops/dist-packages.
Then you may upload the packages on the configuration page in the MLOps platform to start the federated learning flow.
Building...
You have finished all building process.
Now you may use ./mlops/server-package.zip to start your federated learning run.
The output package is located in mlops folder.
2. Install FedML Agent: fedml login $account_id
After installing the FedML library at your edge devices, you can bind it to MLOps platform with a simple CLI:
fedml login $account_id
Please change $account_id to your own (see the screenshot shown below).
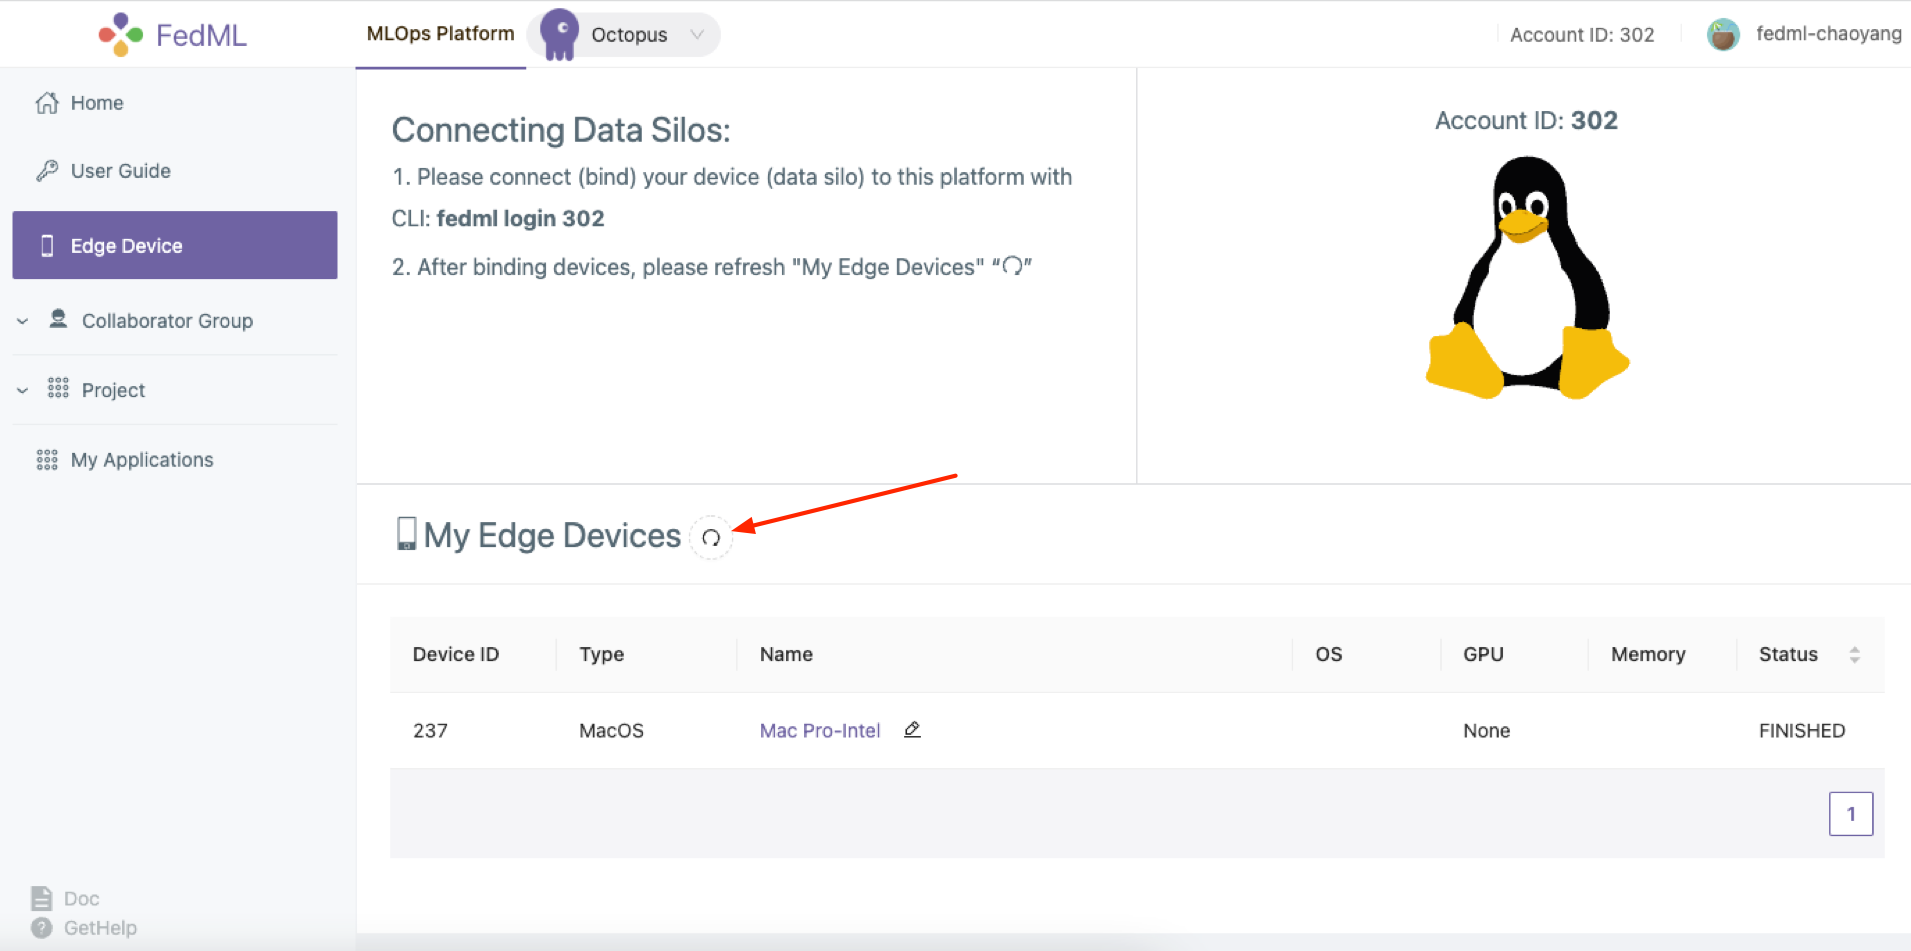 Figure 2: login your edge devices to our platform
In the edge device, you will see the log as below if the script works correctly. You can also press the "refresh" button in Figure 2 to check the status of your device.
(fedml3.7) chaoyanghe@Chaoyangs-MBP cross_silo % fedml login 302
client None, server None
login as client: True, as server: None
/Users/chaoyanghe/sourcecode/FedML_product/FedML/python/fedml/cli/edge_deployment/client_login.py
(fedml3.7) chaoyanghe@Chaoyangs-MBP cross_silo % Namespace(local_server='127.0.0.1', type='login', user='302', version='release')
Namespace(account_id=302, cloud_region='', config_version='release', current_running_dir='/Users/chaoyanghe/fedml-client', device_id='0xb6ff42da6a7e', local_server='127.0.0.1', log_file_dir='/Users/chaoyanghe/fedml-client/fedml/logs', os_name='MacOS', type='login', user=302, version='release')
Current directory of client agent: /Users/chaoyanghe/fedml-client
client ids:[266]
log file path /Users/chaoyanghe/fedml-client/fedml/logs/fedml-run-0-edge-266-upload.log
login: unique_device_id = @0xb6ff42da6a7e.MacOS
login: edge_id = 266
subscribe: flserver_agent/266/start_train
subscribe: flserver_agent/266/stop_train
subscribe: fl_client/flclient_agent_266/status
Congratulations, you have logged into the TensorOpera AI platform successfully!
Your device id is @0xb6ff42da6a7e.MacOS. You may review the device in the MLOps edge device list.
3. Invite Collaborators, Create a Group and a Project
- 3.1 Invite Collaborators
(1) Copy your invitation link
(2) Send the invitation link to your collaborators via any communication tools (e.g., Slack, Facebook Messenger, Email, etc.)
(3) Your collaborators can open the URL and accept the invitation
Now you and your collaborators should be able to see each other on the My Collaborators page.
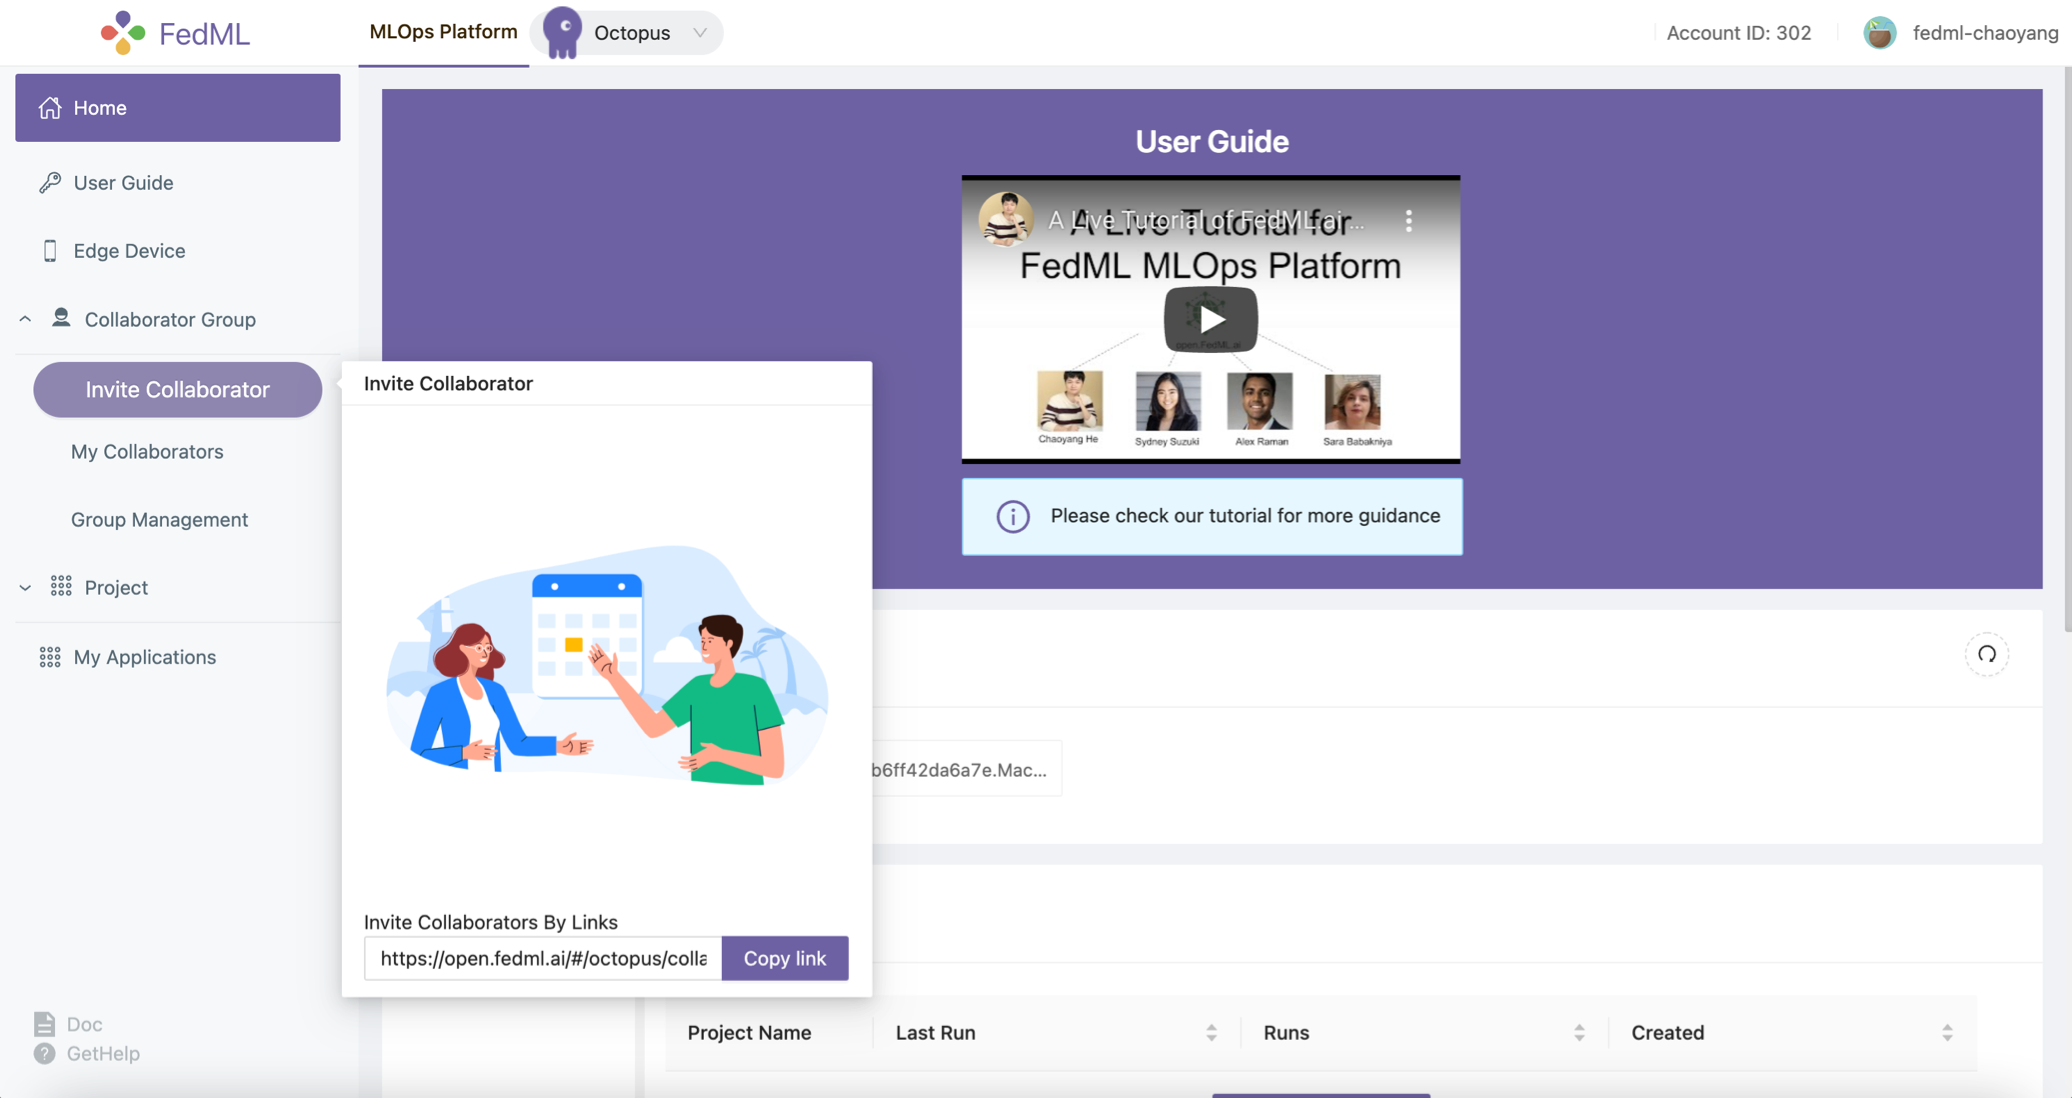 Figure 3: invite your collaborators
- 3.2 Group Management
After inviting your collaborators, you can Create New Group, input the group name, and select your collaborators into the group.
We support a topology visualization to assist you and your collaborators in checking all collaborative edge devices in that group.
Note that after creation, our platform will add newly bound devices from all members to the group. If you would like to change the members in this group, you will have to create a new group.
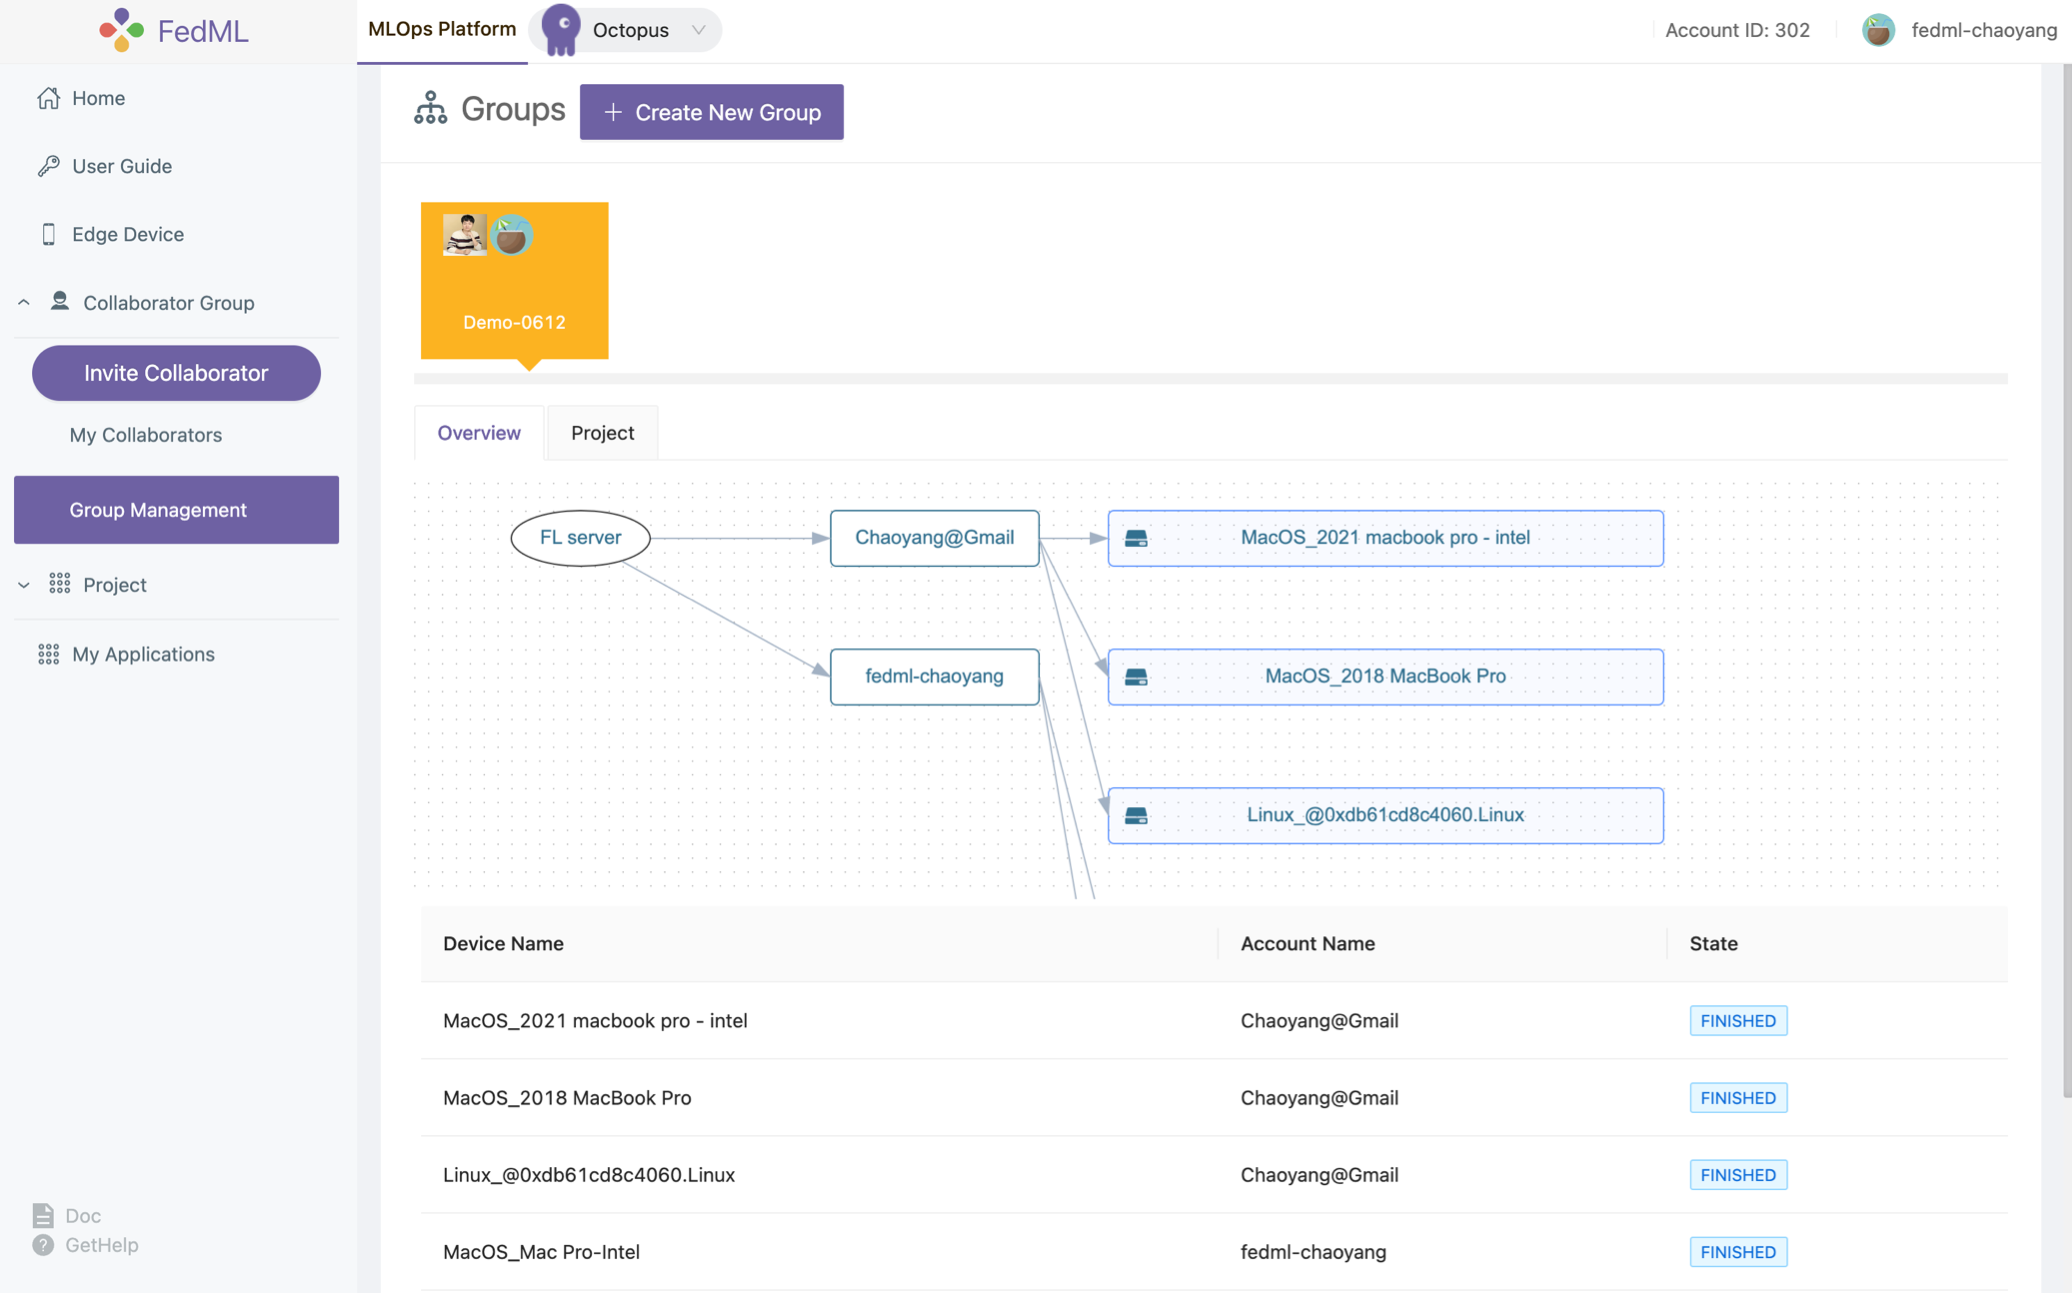 Figure 4: showing the topology of the group
4. Start Run (Training) via Automated Deployment and Scaling
Now let's create a project and get training started!
- Create a new project for a specific group or utilize the existing project you created before
- Open a project and create a new run under the project. By clicking
Start, the run will begin.
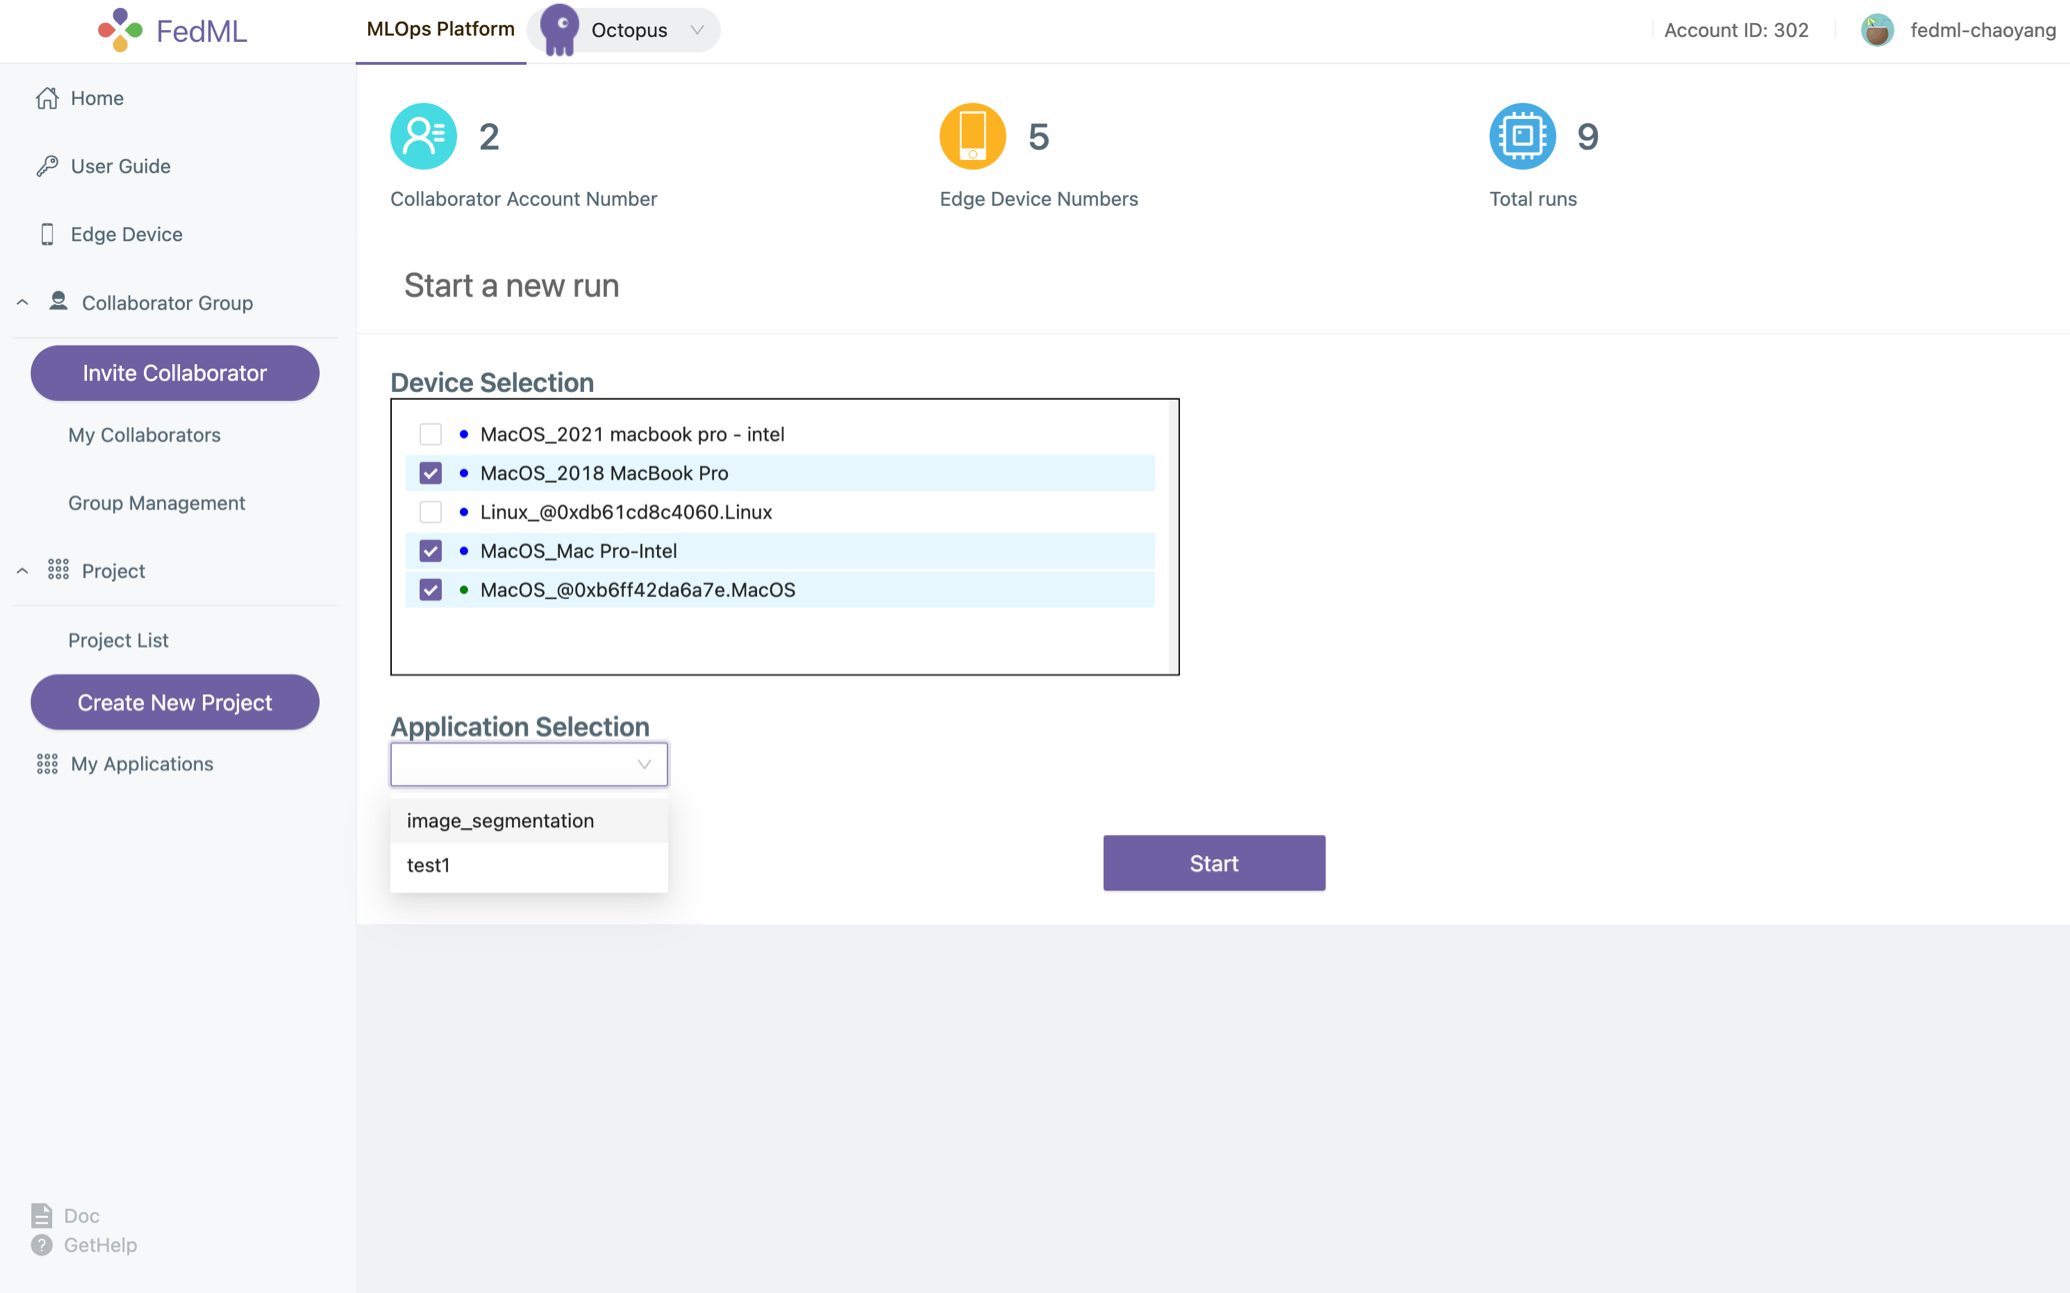 Figure 5: create and start a new run
5. Experimental Tracking via Simplified Project Management
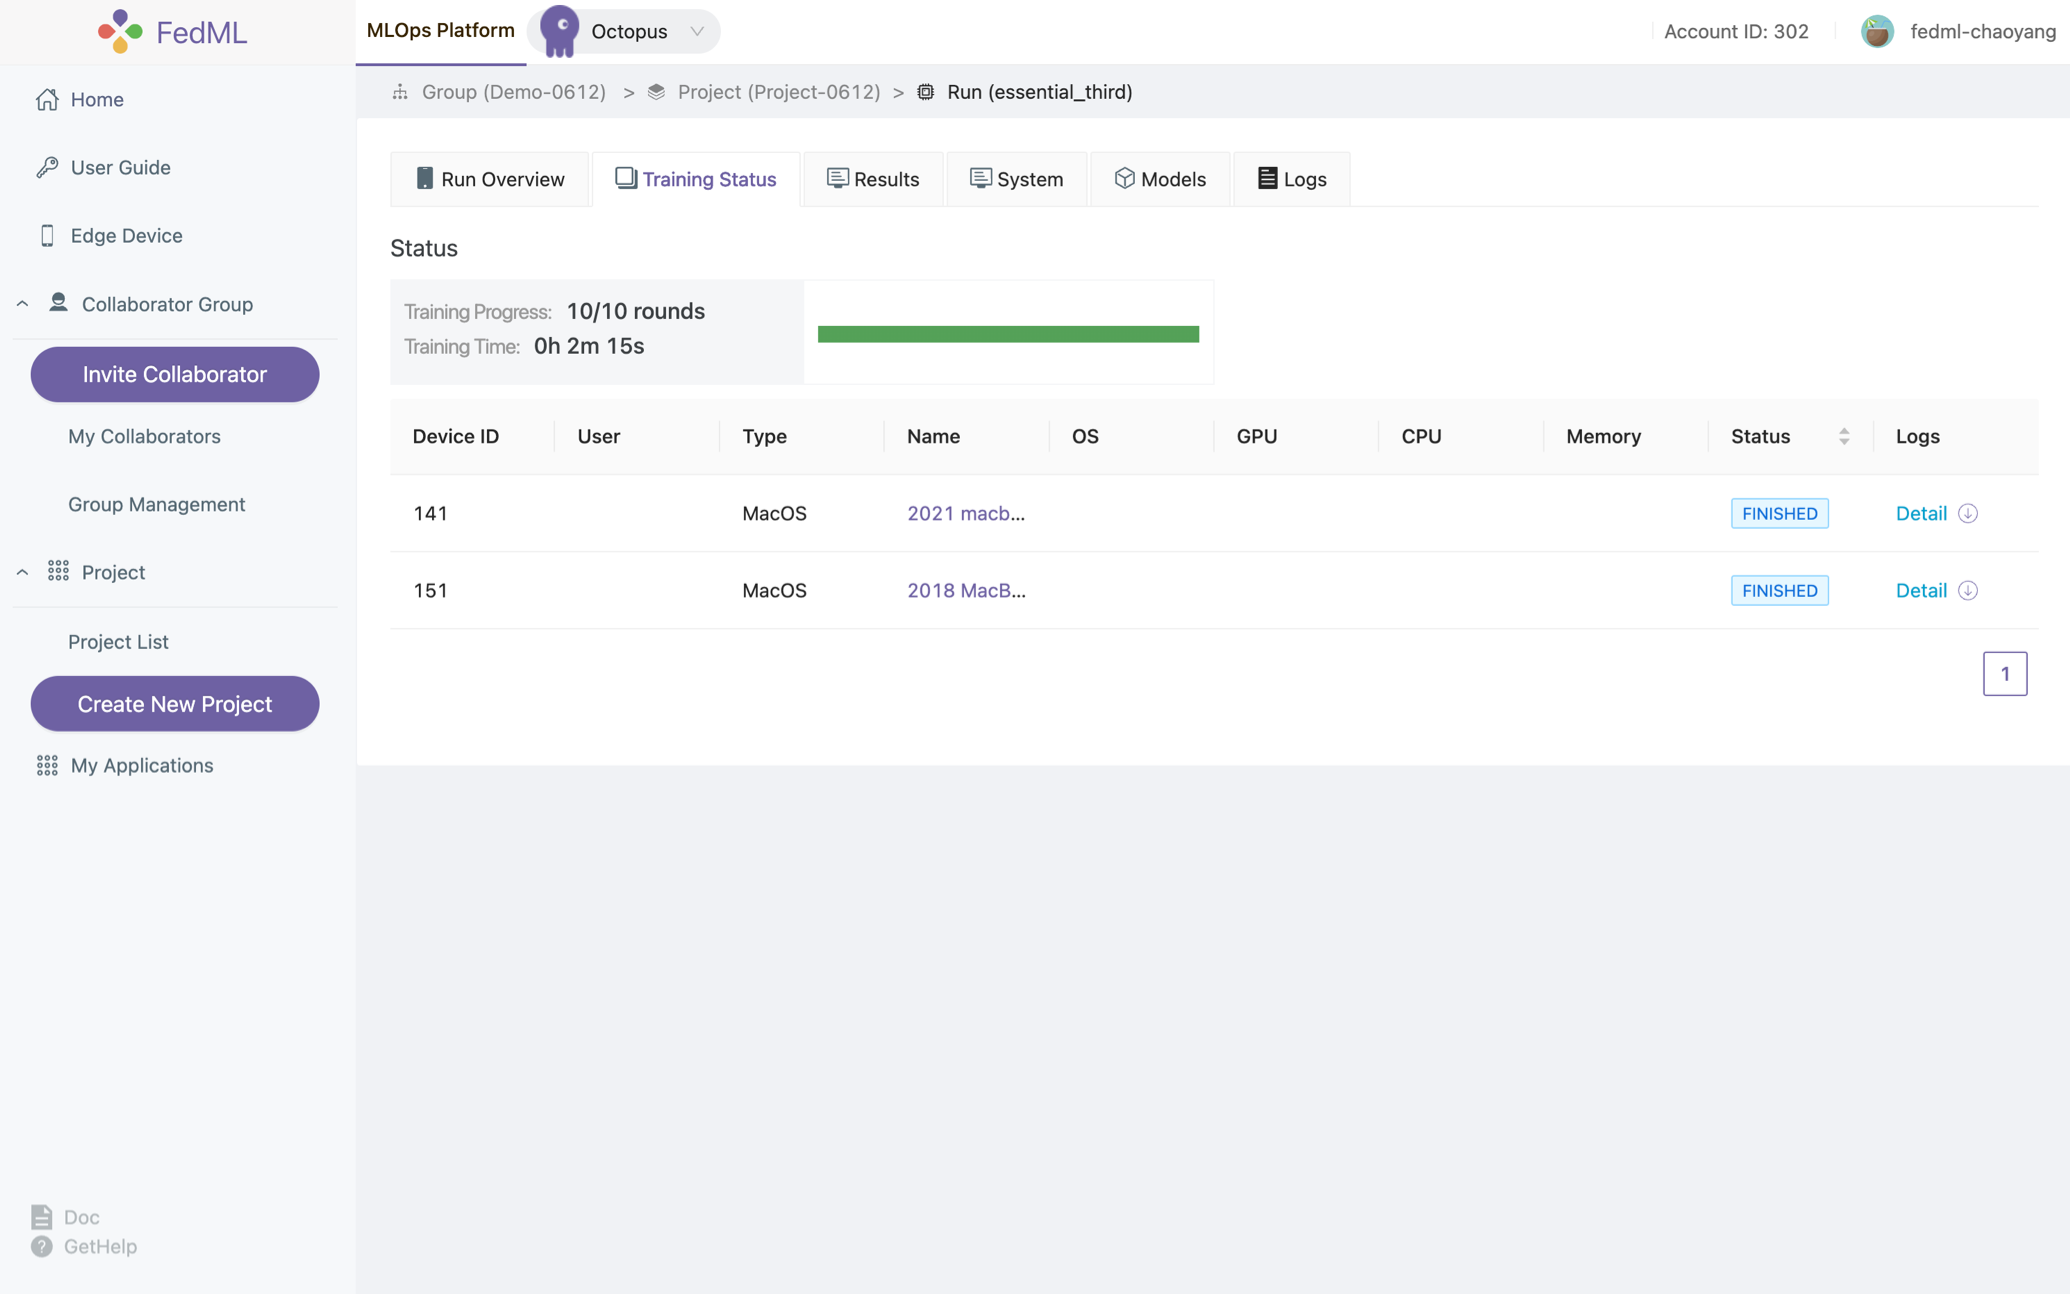
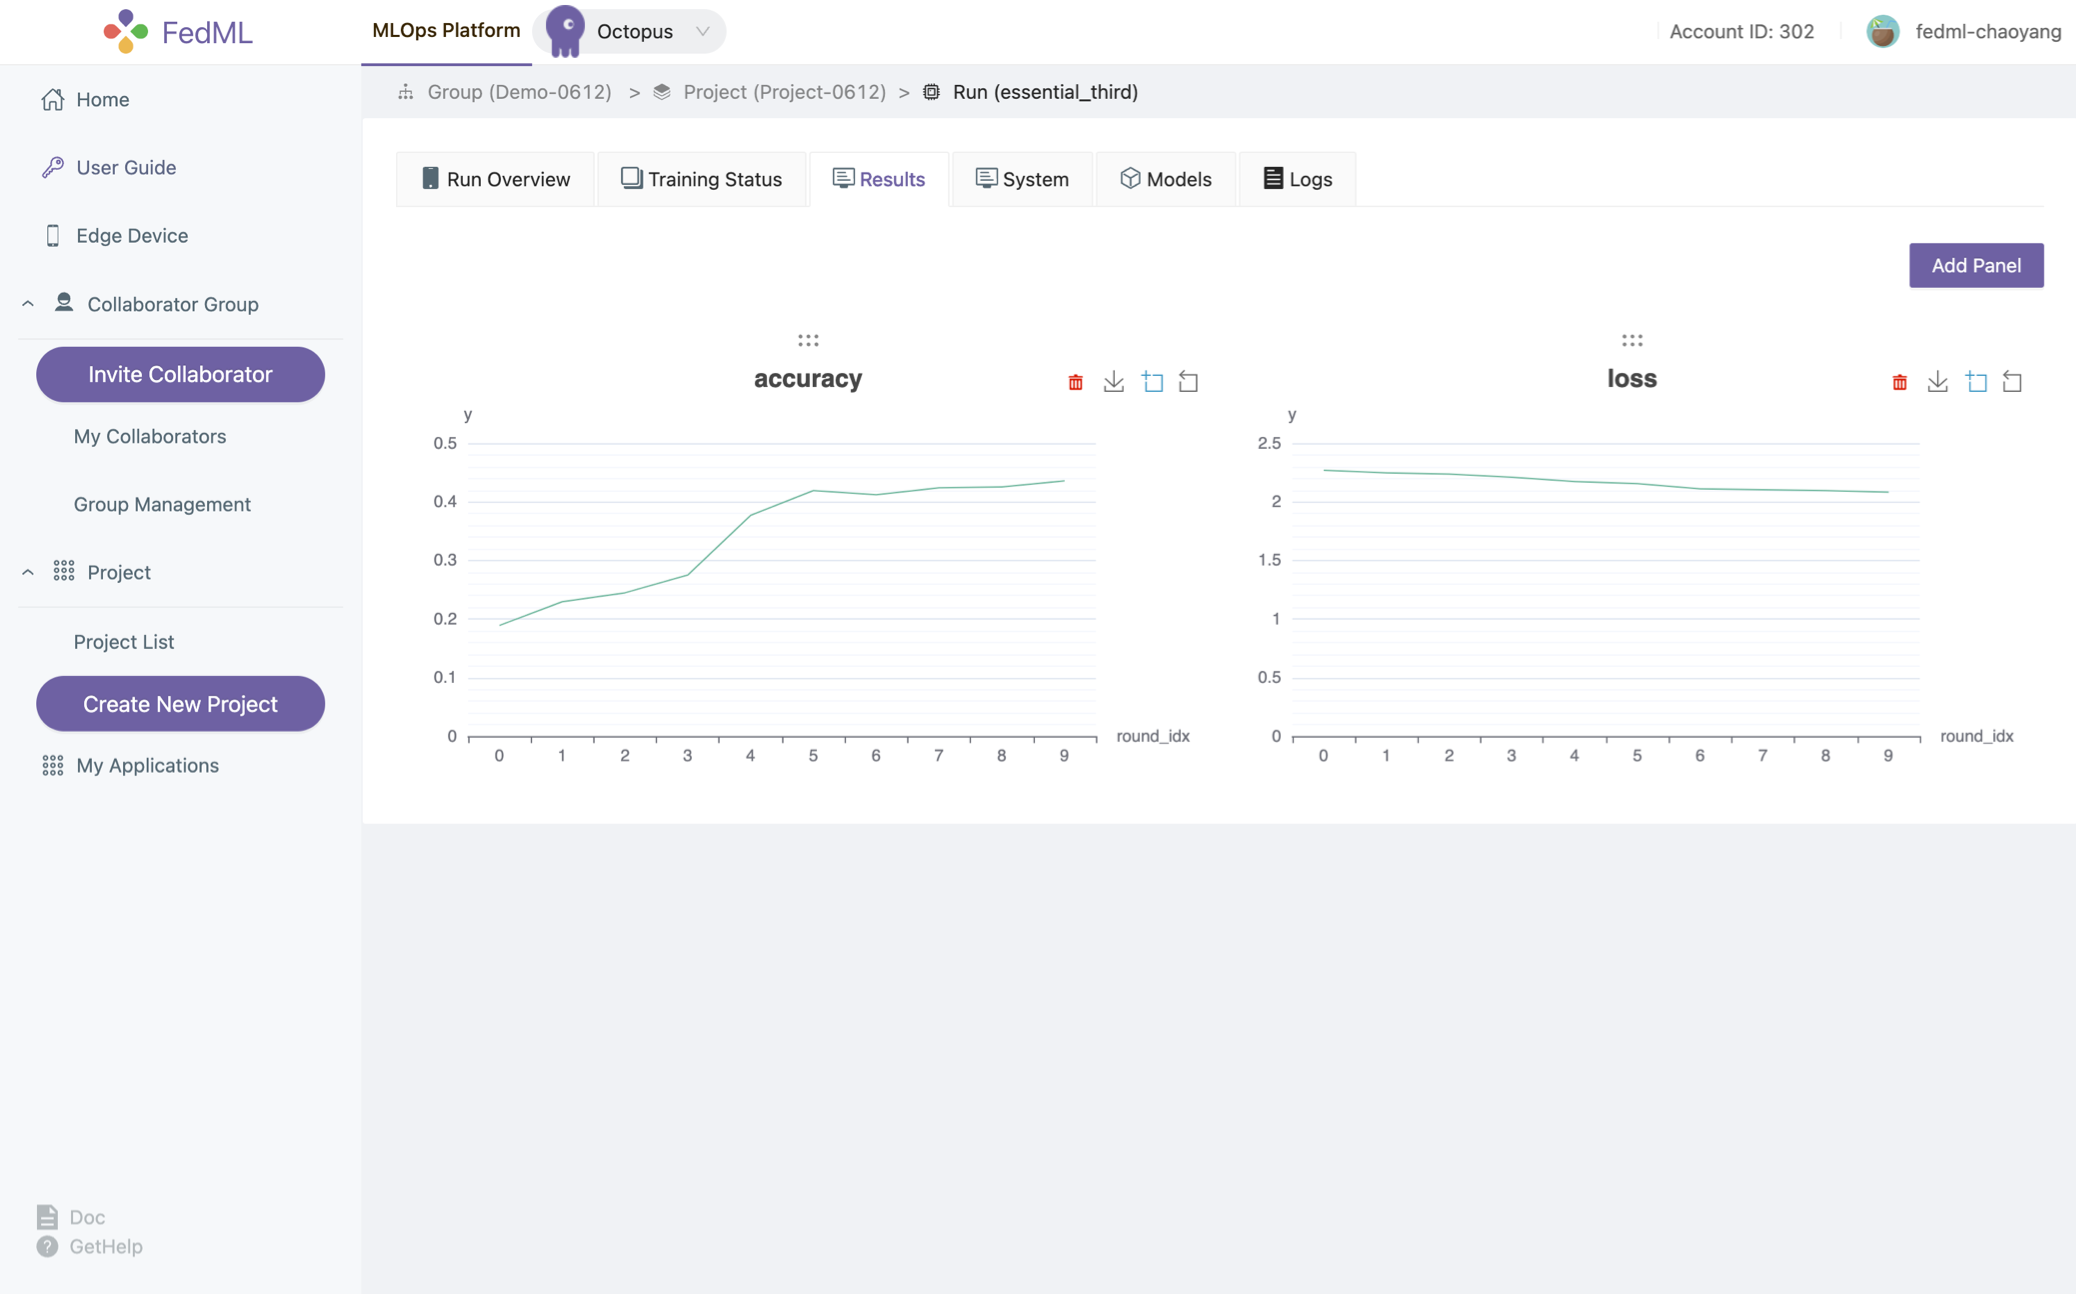
Now you are ready to start the training. Enjoy! We provide the following experimental tracking abilities as follows.
monitoring device status (including logging in each device) and training progress
visualizing training results
visualizing system performance
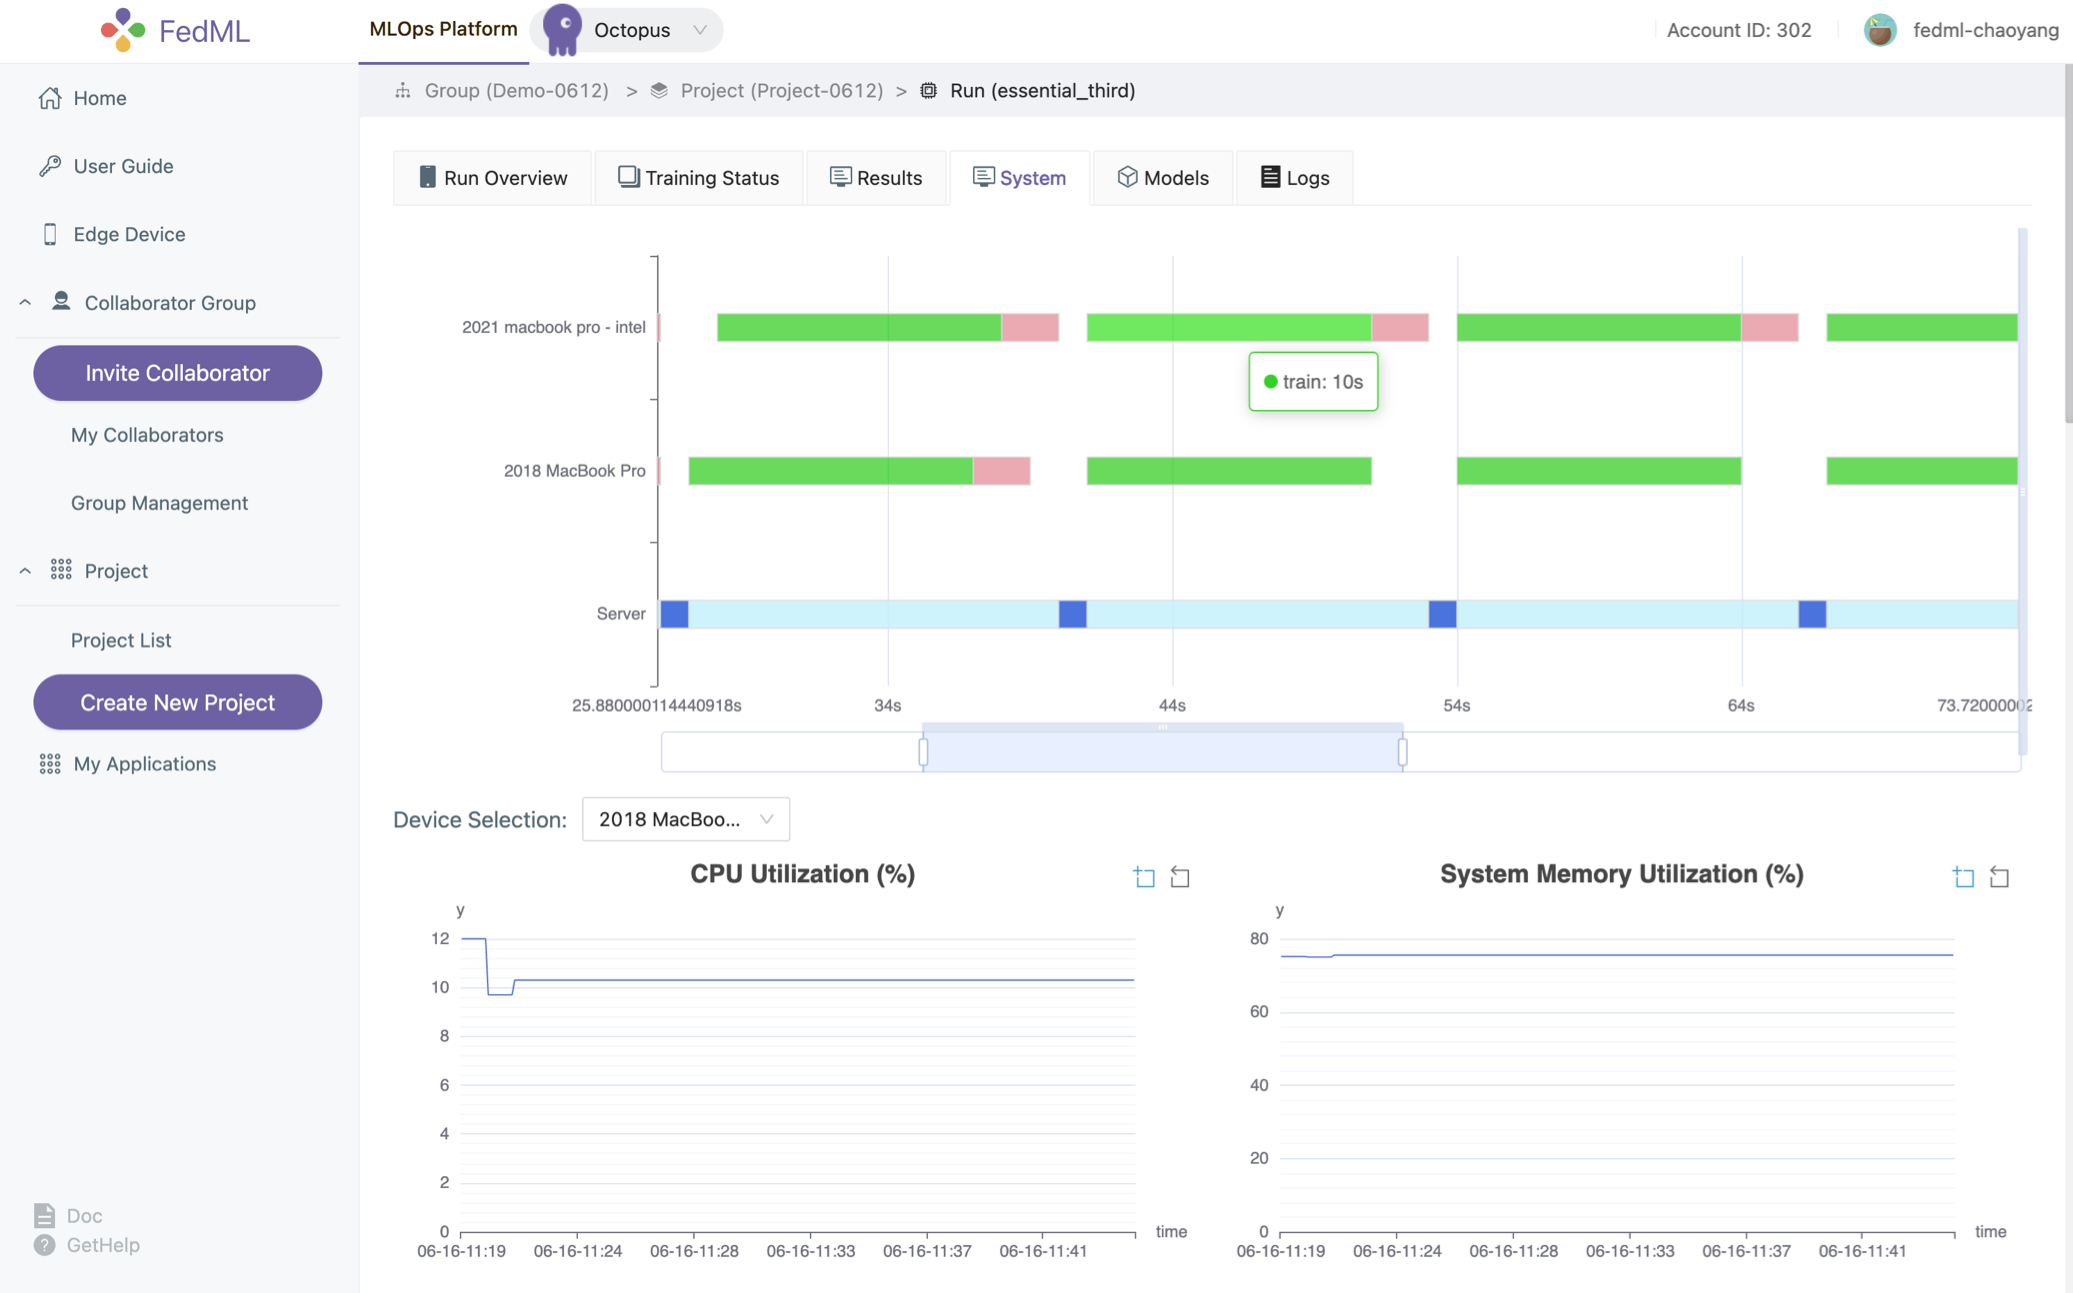
model downloading/serving
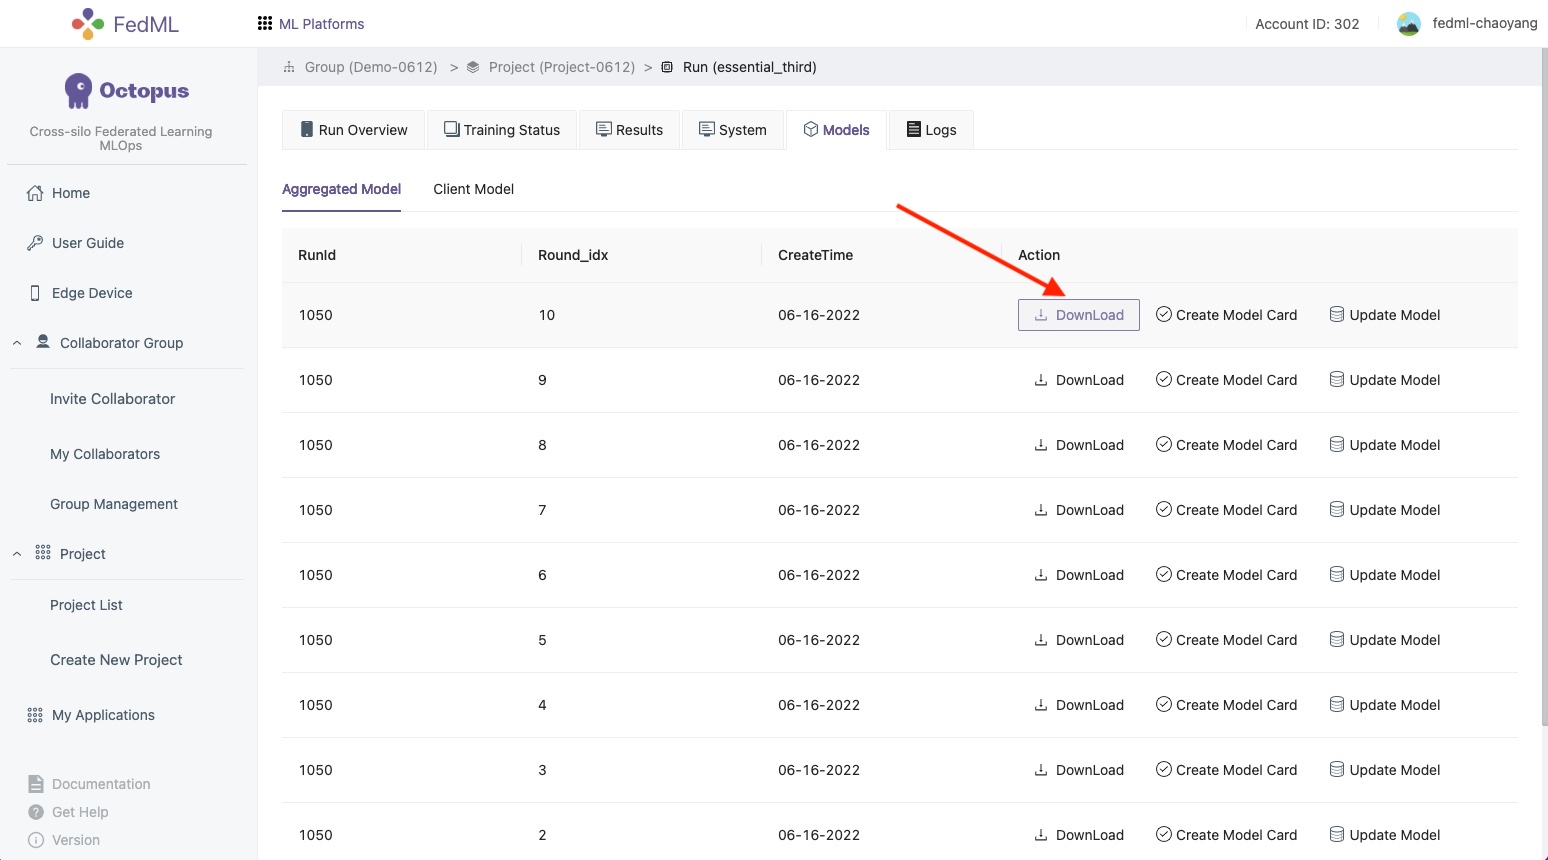 You can use the 'Download' button on the 'Models' tab to download the model parameters. The file is in binary format, storing the parameters of the model after each round of training. To load it, you need to initialize the model using your original model network definition, and then using the pickle module to load these parameters.
  model = YourModelNetwork()
  with open(path_to_download_file, 'rb') as model_params_file_obj:
    model_params = pickle.load(model_params_file_obj)
    model.load_state_dict(model_params)
distributed logging
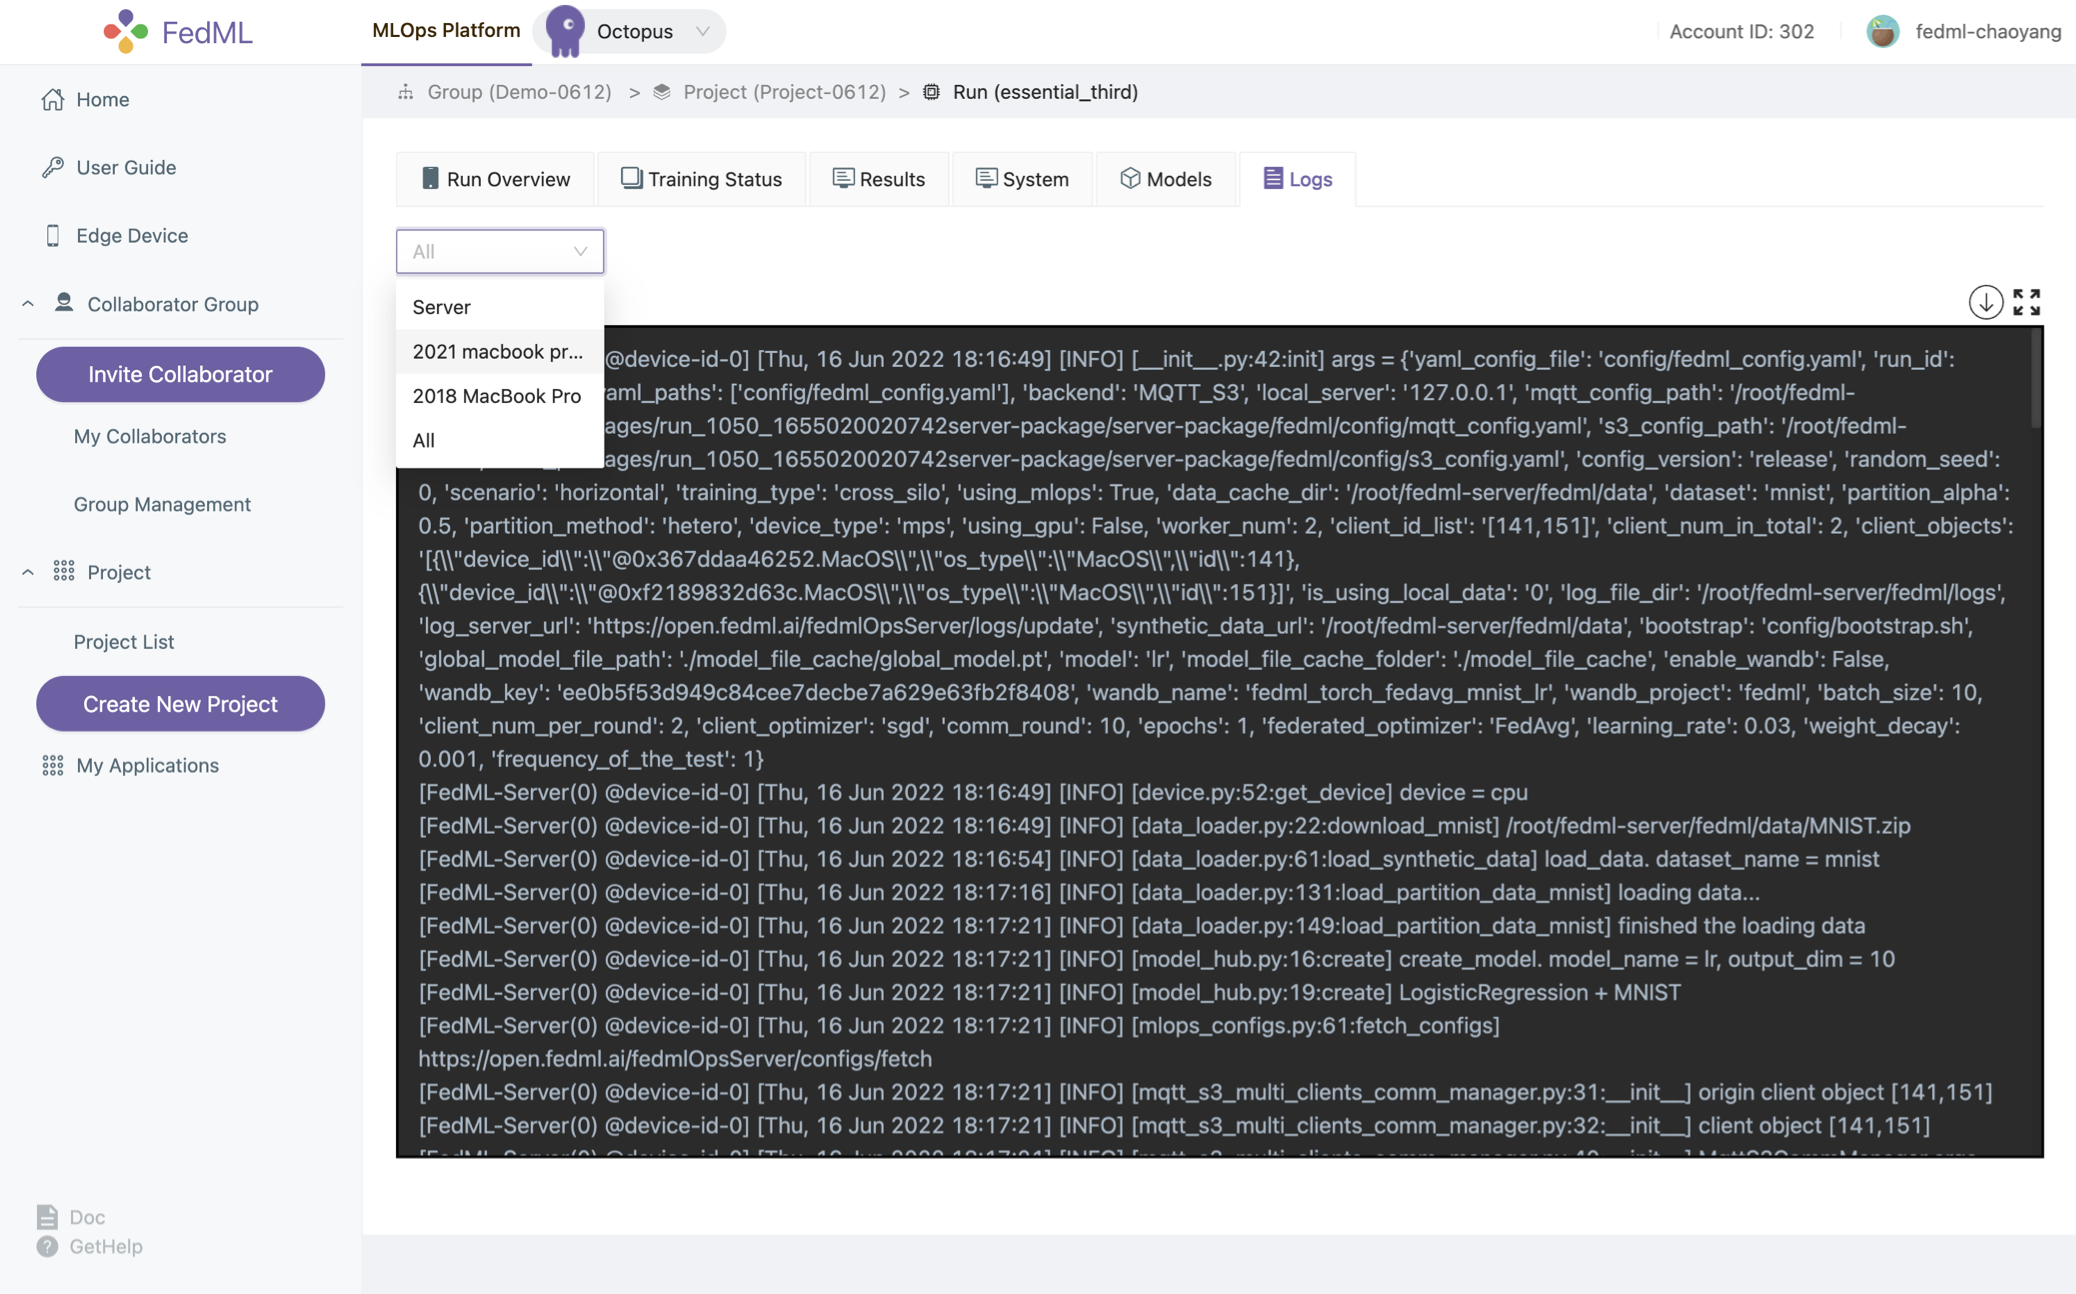
Also, you may review your edge client logs via the command 'fedml logs' in your edge client device, and you may review your edge server logs via the command 'fedml logs -s' in your edge server device.
6. FedML OTA (Over-the-Air) upgrade mechanism
The OTA process is a useful feature of FedML because it ensures that all agents in a run group are using the same version of the platform. This helps to avoid compatibility issues and ensures that everyone is working with the same set of features and bug fixes.
The FedML core framework provides an easy way to upgrade to the latest version of the platform using an over-the-air (OTA) process. When you use the CLI command fedml login $YourUserId to log into the MLOps platform, the core framework compares the local version with the latest version available on the pypi.org repository. If the local version is outdated, the framework initiates the OTA process to upgrade the local fedml pip to the latest version.
Additionally, when you start a new run on the MLOps platform, the FedML server agent runs the OTA process to upgrade its local version. Once the server agent completes the upgrade process, it forwards the OTA request to all FedML client agents in the same run group. The client agents then run the same OTA process to upgrade their local versions.
Although the OTA process automatically upgrades FedML to the latest version, there may be situations where you want to upgrade to a specific version. In this case, you can use the fedml_config.yaml file to specify the version you want to upgrade to. Simply add the following configuration keys under the common_args section:
  common_args:

      upgrade_version: 0.8.2

      no_upgrade: false
If you set the value of no_upgrade to true, neither the FedML server agent nor the client agent will run the OTA process when you start a new run.
Overall, the OTA process and the ability to specify a specific version to upgrade to make upgrading FedML convenient and flexible for users.